Initial Server Setup with Ubuntu 18.04
Updated: 2019-02-17
Root Login
Log into your server, with root user
You will need your server's public IP address. You will also need the password or, if you installed an SSH key for authentication, the private key for the "root" user's account.
What is my public IP?
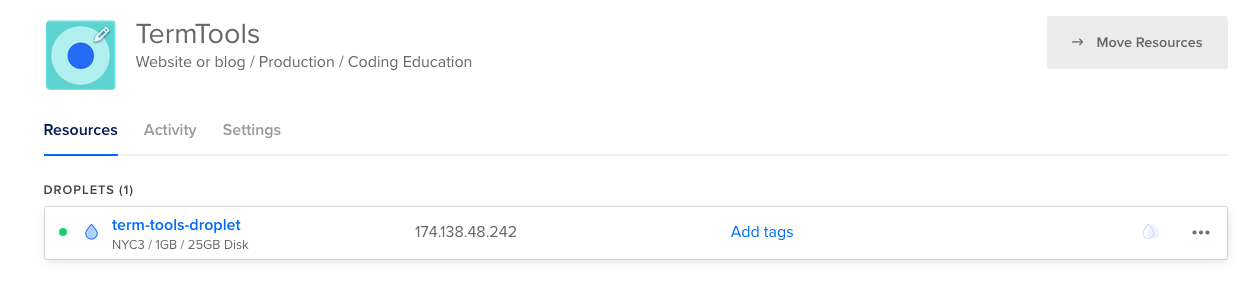
From your DigitalOcean account, select your project and your public IP will be diplayed. My public IP is 174.138.48.242.
The default username is root on most operating systems, like Ubuntu and CentOS.
By default, the password for that user is randomly generated and emailed to you at your account’s email address. A password will not be generated and emailed if you have uploaded SSH keys to your account and chosen Add SSH Keys. Your key will be used automatically and you’ll be prompted for the key’s passphrase if you’ve set one.
Open your terminal and execute this SSH command:
Change to your IP address after the @
ssh root@174.138.48.242
Your logged in! Now what?
Time to tighten some things up!
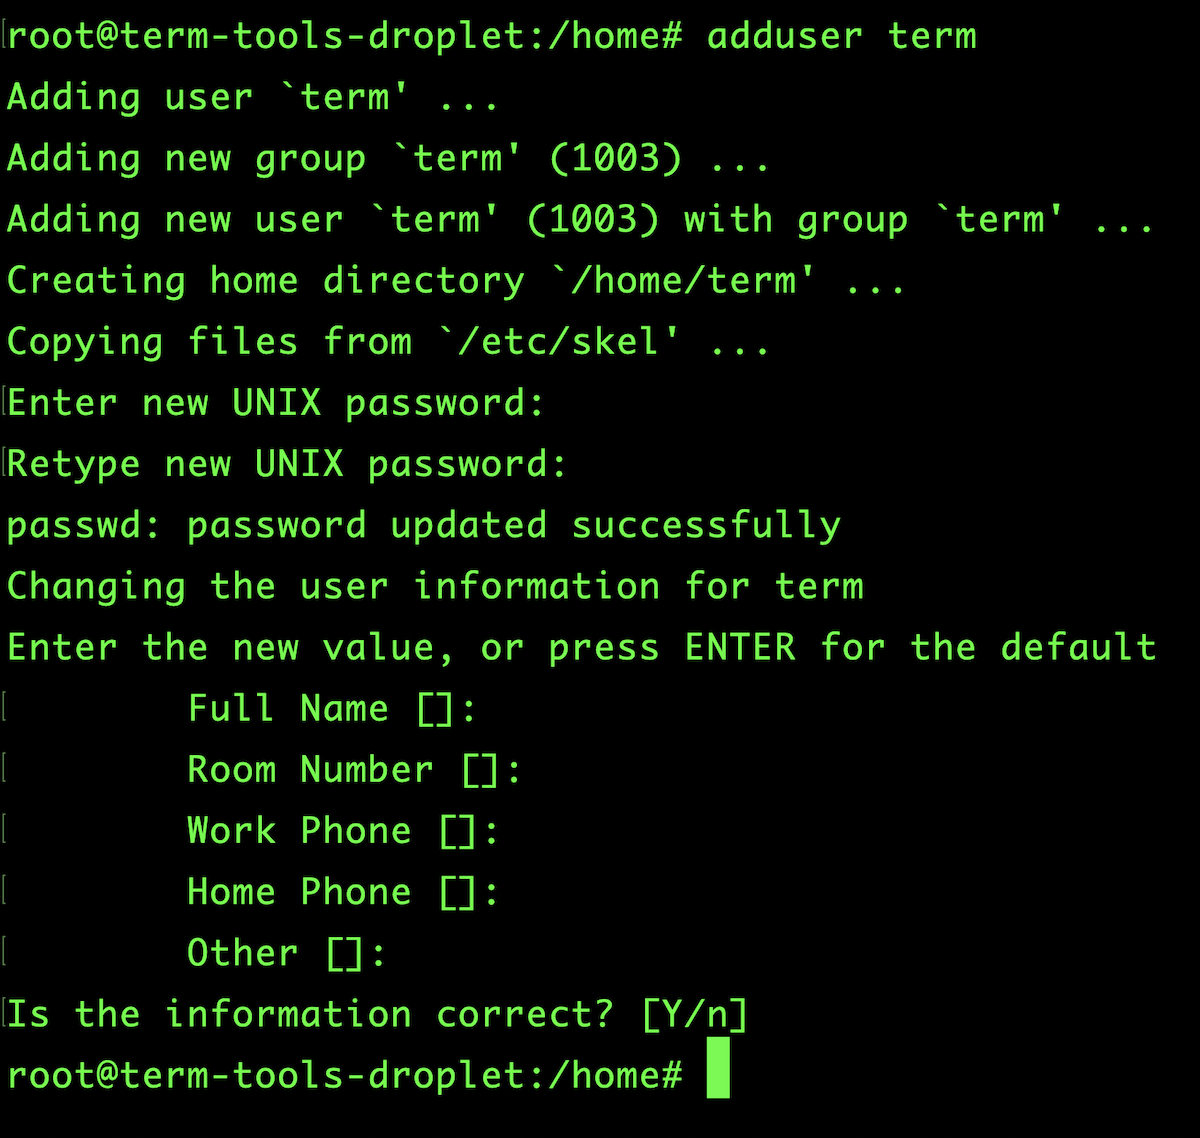
First, let's create a new user (root is dangerous). We will name our new user term.
adduser term
That created our user, group and directory. Now we set our user password and some other basic information:
You can just click Enter for info you wanna skip.
- Password
- Full Name
- Room Number
- Work Phone
- Home Phone
- Other
Our user is gonna need sudo!
Right now our user cannot sudo, let's fix that.
usermod -aG sudo term
Now we can run commands with superuser privileges!
Setup Public Key Authentication
Public Key Authentication is Safer!
Now we are gonna setup Public Key Authentication and turn off password authentication. This will make our server a little more secure and we won't have to enter a password everytime we login.
Generate a Key
First, let's exit out of our server and go back to our local machine.
exit
Now we generate our key.
ssh-keygen
Hit return to accept the file name and path (or enter a new name).
Next enter a passphrase or leave it blank.
Copy the Public Key up to the Server
We need to copy our Public Key up to our server.
ssh-copy-id term@your_server_ip
Disable Password Authentication
Log back into your server.
ssh term@your_server_ip
We need to make a couple changes to our /etc/ssh/sshd_config file.
sudo vim /etc/ssh/sshd_config
PermitRootLogin no
PasswordAuthentication no
PubkeyAuthentication yes
ChallengeResponseAuthentication no
Reload the SSH daemon.
sudo service ssh reload
SUDO Without Password
Allow user to sudo without password.
Add this line, with your username.
user ALL=(ALL) NOPASSWD:ALL
Setup Our Firewall
Setup UFW firewall
See App List.
sudo ufw app list
Allow SSH connections.
sudo ufw allow OpenSSH
Enable UFW Firewall.
sudo ufw enable
Check status.
sudo ufw status
Update and Install Package Dependencies
Install PHP 7.2
Add Ondrejs PPA Repo.
sudo add-apt-repository ppa:ondrej/php
Resynchronize package index files.
sudo apt-get update
Upgrade.
sudo apt-get upgrade
Install language pack.
sudo apt-get install language-pack-en
Remove PHP 7.0
sudo apt-get purge php7.0 php7.0-common
Add PHP 7.2 CLI
sudo apt install php7.2-cli
Add Other Packages
sudo apt-get install php7.2-curl php7.2-xml php7.2-zip php7.2-gd php7.2-mysql php7.2-mbstring
Remove unused packages
sudo apt autoremove
Restart server
sudo shutdown -r now
Install the Nginx Web Server
Nginx Web Server
Install Nginx Web Server.
sudo apt install nginx
Allow HTTP connections.
sudo ufw allow 'Nginx HTTP'
Check status.
sudo ufw status
Check which IP address is accessible.
curl -4 icanhazip.com
Install MySQL
Installing and Configuring MySQL Database
Installing MySQL Database.
sudo apt install mysql-server
Run MySQL script to secure the installation.
sudo mysql_secure_installation
Set a password for root MySQL user.
sudo mysql
Check authentication method of each MySQL user accounts.
SELECT user,authentication_string,plugin,host FROM
                                mysql.user;
Configure the root account to authenticate with a password.
ALTER USER 'root'@'localhost' IDENTIFIED WITH
                                mysql_native_password BY 'password';
Flush the privileges.
FLUSH PRIVILEGES;
Exit MySQL.
EXIT;
Now the root user must login with a password.
mysql -u root -p
Add Ubuntu's universe repository.
sudo add-apt-repository universe
Install the php-fpm module along with an additional helper packages.
sudo apt install php-fpm php-mysql
Create MySQL User and Database
Create our database.
CREATE DATABASE db_name;
Create our database user.
CREATE USER 'username'@'localhost'
                                IDENTIFIED BY
                                'password';
Give your user privileges.
GRANT ALL PRIVILEGES ON db_name.* TO 'username'@'localhost' WITH GRANT OPTION;
Flush the privileges.
FLUSH PRIVILEGES;
For a more detailed explanation: Check out these tutorials.